

Key takeaways
- Best all-round broadcast microphone: Electro-Voice RE20. Its Variable-D design keeps bass response more consistent when you move closer or farther away.
- Best familiar studio vocal sound: Shure SM7B. It offers a smooth broadcast voicing, excellent off-axis rejection, and replaceable windscreens, but needs a strong preamp or an inline gain booster.
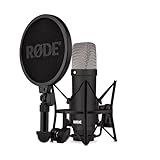
- Best USB/XLR value for streaming: RØDE PodMic USB. It connects directly by USB-C or through XLR and includes headphone monitoring.
- Best for a noisy room on a tighter budget: a close-positioned supercardioid dynamic microphone, such as the Shure MV7X or comparable broadcast model. The tighter pattern can reduce room sound when aimed correctly.
- Best for a permanently mounted studio arm: a broadcast dynamic microphone paired with a rigid arm rated above the microphone’s weight, with internal cable routing and a locking desk clamp.
The best boom microphones for voice and recording depend on your room, microphone distance, and connection method: choose the Shure SM7B for established studio rigs, the RØDE PodMic USB for simple USB recording, the Electro-Voice RE20 for broadcast-style consistency, and a supercardioid dynamic microphone when background-noise rejection matters most.
Our top picks


As an Amazon Associate we earn from qualifying purchases at no extra cost to you. Ratings are shown as listed on Amazon.
Quick picks by situation
- Best all-round broadcast microphone: Electro-Voice RE20. Its Variable-D design keeps bass response more consistent when you move closer or farther away.
- Best familiar studio vocal sound: Shure SM7B. It offers a smooth broadcast voicing, excellent off-axis rejection, and replaceable windscreens, but needs a strong preamp or an inline gain booster.
- Best USB/XLR value for streaming: RØDE PodMic USB. It connects directly by USB-C or through XLR and includes headphone monitoring.
- Best for a noisy room on a tighter budget: a close-positioned supercardioid dynamic microphone, such as the Shure MV7X or comparable broadcast model. The tighter pattern can reduce room sound when aimed correctly.
- Best for a permanently mounted studio arm: a broadcast dynamic microphone paired with a rigid arm rated above the microphone’s weight, with internal cable routing and a locking desk clamp.
Best boom microphones compared
“Boom microphone” can mean either a microphone designed for a boom arm or a boom-mounted microphone used in film and live production. This comparison focuses on desk- or stand-mounted voice microphones for streaming, broadcasting, podcasting, and studio recording.
| Microphone | Pickup pattern | Connection | Weight | Useful strength | Typical market range in 2026 |
|---|---|---|---|---|---|
| Shure SM7B | Cardioid | XLR | 765 g | Controlled broadcast tone; switchable bass roll-off and presence boost | About $350–$450 |
| Electro-Voice RE20 | Cardioid | XLR | 737 g | Reduced proximity-effect change through Variable-D construction | About $400–$550 |
| RØDE PodMic USB | Dynamic cardioid | USB-C and XLR | 900 g | Direct computer connection plus analog upgrade path | About $180–$230 |
| Shure MV7X | Dynamic cardioid | XLR | 550 g | Compact close-talk microphone for smaller arms and desks | About $150–$220 |
| Audio-Technica BP40 | Dynamic hypercardioid | XLR | 632 g | Tighter front-focused pickup for voice isolation | About $300–$400 |
Weights are important because an arm that holds a lightweight microphone may slowly droop under a heavier broadcast model. Budget separately for a suitable arm, shock isolation, and a reliable XLR cable. A complete setup commonly adds $70–$250, depending on whether you need a basic desk arm or a heavy-duty broadcast arm.
Pickup patterns: cardioid versus hypercardioid
Cardioid
Cardioid microphones are the easiest choice for most streamers and broadcasters. They favor sound from the front and reduce sound from behind, making them forgiving when your mouth position changes slightly. Place the microphone’s front toward you and keep the loudest unwanted source—such as a desktop fan or computer—behind the microphone where possible.
The Shure SM7B, RE20, PodMic USB, and MV7X are all practical cardioid choices. Their rejection is useful, but it is not magic: a microphone close to your mouth will still hear a loud keyboard, a nearby reflective wall, or a noisy chair.
Hypercardioid and supercardioid
A tighter pattern can reduce room reflections and side noise, but it demands more accurate placement. The Audio-Technica BP40’s hypercardioid design can suit a compact, untreated room when the microphone is kept close and aimed precisely. Tighter patterns also have rear sensitivity, so do not place the loudest noise source directly behind the microphone.
Head-to-head: SM7B, RE20, and PodMic USB
Shure SM7B versus Electro-Voice RE20
The SM7B is often the better fit when you want a close, polished voice sound and are willing to remain in a fairly consistent position. Its rear switches provide useful tonal shaping, while its included windscreen helps control plosives. It has relatively low output, so check that your interface can provide sufficient clean gain.
The RE20 is more tolerant of changes in speaking distance. Its Variable-D design reduces the bass increase that many directional microphones produce when a speaker moves closer. That makes it attractive for radio-style delivery, narration, and presenters who naturally lean toward and away from the microphone. It is physically large and needs a strong arm or stand.
PodMic USB versus an XLR-only microphone
The PodMic USB is the simpler purchase for a new streamer. USB gets audio into a computer without an interface, while XLR lets you move to a mixer or interface later. Its headphone output also supports direct monitoring. An XLR-only microphone can offer a similarly serious voice result, but requires an interface, suitable gain, and more cable management from the beginning.
How much boom reach do you need?
- Small desk, one fixed position: approximately 50–75 cm of horizontal reach is usually enough.
- Wide monitor or two-person desk: look for roughly 75–100 cm of usable reach and a clamp that clears the desktop edge.
- Broadcast arm beside a camera: a longer arm with friction or spring adjustment can move the microphone out of frame, but it needs a heavier base and careful balancing.
Mount the arm so the microphone approaches your mouth from slightly below or beside the camera, rather than extending directly in front of your face. This keeps the microphone close while preserving a clear view of the screen. For a typical spoken-word setup, position the capsule about 10–15 cm from your mouth, slightly off-axis. That distance provides a strong voice-to-room ratio while reducing breath blasts.
Decision matrix for choosing a boom microphone
| Your situation | Recommended type | Why | What to avoid |
|---|---|---|---|
| First setup, USB-only computer, occasional streaming | USB/XLR dynamic | Low equipment count and an easy future upgrade path | Buying an expensive XLR microphone before budgeting for an interface |
| Daily broadcast or podcast work | Cardioid broadcast dynamic | Consistent close voice sound and durable construction | Lightweight arms rated close to the microphone’s limit |
| Untreated room with computer noise | Close-positioned dynamic, possibly hypercardioid | Less room ambience and lower sensitivity to distant noise | Condenser microphones placed far from the speaker |
| Studio vocal recording with a quiet, treated room | Dynamic broadcast mic or large-diaphragm condenser | The room is good enough to benefit from greater detail if desired | Choosing a pickup pattern without considering reflections |
| Shared desk or frequent repositioning | Compact microphone and quick-adjust arm | Less reach, weight, and cable strain during movement | Oversized microphones that block the display or droop the arm |
Connectivity and gain requirements
USB is convenient, but it ties the microphone to a computer or compatible host. XLR is the better long-term choice for mixers, audio interfaces, multiple microphones, and more flexible routing. USB/XLR models offer the broadest upgrade path, though their internal digital electronics can add cost and weight.
Before buying an XLR dynamic microphone, check the interface’s maximum microphone gain. A passive inline booster can add roughly 20–30 dB, but it still needs phantom power from the interface and does not replace a poor preamp. Never assume that turning up the interface gain is harmless: excessive gain can raise hiss along with the voice.
Setup mistakes that reduce noise rejection
- Attach the arm to a rigid part of the desk, not a thin cable-management panel.
- Balance the arm with the microphone installed before tightening its joints.
- Angle the rear or null of the pickup pattern toward the loudest unwanted source.
- Keep the capsule close enough that your voice dominates room sound.
- Use a pop filter or windscreen, especially with close speech and plosive-heavy voices.
- Set recording peaks around -12 to -6 dBFS rather than trying to record as loud as possible.
A useful placement calculation is the inverse-distance rule: moving the microphone from 30 cm to 15 cm can increase the direct voice level by about 6 dB in the idealized near-field relationship. That extra voice level can make a room or fan seem quieter without software noise reduction, provided your microphone technique remains controlled.
Durability and ownership costs
The first parts to wear are usually the windscreen, arm joints, desk clamp padding, and cable connectors—not the dynamic capsule. Replace a compressed or stained windscreen rather than washing one that contains foam adhesive or glued layers. Wipe the exterior with a lightly damp, lint-free cloth, keep liquid away from switches and connectors, and allow any removable grille or windscreen to dry completely before reinstalling.
Common long-term problems include overtightening the microphone yoke, repeatedly bending the XLR cable at the connector, and exceeding the arm’s stated load. Leave enough cable slack for full arm movement and periodically check clamp screws. With daily use, a $200–$500 microphone can be a sensible long-term purchase if the mounting hardware is strong; a cheap arm that must be replaced twice can erase much of the initial saving.
Final recommendation
Choose the RØDE PodMic USB if you want the least complicated route into streaming. Choose the Shure SM7B for a close, recognizable broadcast presentation and the Electro-Voice RE20 if distance changes are part of your delivery. For a noisy or reflective room, prioritize close placement, correct pattern orientation, and a stable boom arm before spending more on premium features. The best boom microphone is the one that stays correctly positioned, matches your available gain, and makes your voice louder than the room.




Write Your Review
No reviews yet. Be the first to share your experience!